2016년 12월 28일 수요일

Jekyll 을 이용하여 만든 Github 블로그 테마 적용하기

 Github 블로그 테마 적용

자신이 원하는 테마를 선택하여 다운로드하여 로컬저장소 폴더내에 복사하여 넣습니다.
일단 아래 링크에서 마음에 드는 테마를 고르세요
http://jekyllthemes.org/

선택한 테마의 Github 저장소로 이동하여 Clone or download에 Download ZIP 버튼을 클릭하여 프로젝트 파일을 다운로드합니다.(아래 이미지 참조)


다운로드한 파일을 로컬저장소 폴더내에 복사하여 넣습니다.
<참조 : 로컬 저장소 만드는 방법  ->http://swifteyes.blogspot.kr/2016/12/mac-jekyll-github.html>
테마마다 폴더내 파일 구성이 다르기 때문에 Gemfile , Gemfile.lock 이 두 파일은 제외하고 복사해서 넣어야 아래 오류들이 발생하지 않습니다.


in `rescue in specs': Your bundle is locked to i18n (0.7.0), but that version could not be found in any of the sources listed in your Gemfile. If you haven't changed sources, that means the author of i18n (0.7.0) has removed it. You'll need to update your bundle to a different version of i18n (0.7.0) that hasn't been removed in order to install. (Bundler::GemNotFound)


터미널을 실행하여 로컬저장소 폴더위치로 이동 후 아래명령어중 하나를 입력하면 빌드가 진행됩니다.
bundle exec jekyll serve
jekyll serve

참고 ) 빌드 진행중에 에러가 발생 할 경우 
테마마다 발생하는 오류가 다를것으로 예상되나 필자가 사용한 테마들의 경우 아래 에러들이 발생하였습니다.

<codinfox-lanyon-dev 테마의 경우>

 Dependency Error: Yikes! It looks like you don't have jekyll-paginate or one of its dependencies installed. In order to use Jekyll as currently configured, you'll need to install this gem. The full error message from Ruby is: 'cannot load such file -- jekyll-paginate' If you run into trouble, you can find helpful resources at http://jekyllrb.com/help/! 
jekyll 3.3.1 | Error:  jekyll-paginate

<karna-gh-pages 테마의 경우>
Dependency Error: Yikes! It looks like you don't have jekyll-seo-tag or one of its dependencies installed. In order to use Jekyll as currently configured, you'll need to install this gem. The full error message from Ruby is: 'cannot load such file -- jekyll-seo-tag' If you run into trouble, you can find helpful resources at http://jekyllrb.com/help/! 
jekyll 3.3.1 | Error:  jekyll-seo-tag

해결방법은 테마적용에 필요로 하는 파일을 추가해주는 것으로 해결이 되었습니다.
로컬저장소의 Gemfile 이라는 파일을 열어 필요로 하는 파일 이름을 추가합니다.
예) jekyll-paginate 일 경우

source "https://rubygems.org"

gem "jekyll"
gem "jekyll-paginate"
Gemfile 에 추가 하였다면 저장 후 터미널에 아래 명령어를 입력하여 설치합니다.

$ bundle install
$ bundle exec jekyll serve


참고) 터미널에  $ bundle exec jekyll serve  명령어 입력 시 발생할 수 있는 에러들 ==

1)
Gem files will remain installed in /usr/local/lib/ruby/gems/2.4.0/gems/json-1.8.3 for inspection...

: 루비를 최신버전으로 설치 했을 시 2.4.0(글 쓴 기준일) 버전으로 설치되는데 json-1.8.3 을 설치해야 합니다.

gem install json -v '1.8.3'

위 설치명령어로 설치중에 또 다른 에러가 발생 할 수 있습니다.
글 쓴 시점에선 최신버전 2.4.0 버전에선  json-1.8.3을 지원 못한다는것이였습니다.
그래서 필자는 루비버전관리자인 RVM 을 이용하여 루비 2.3.3 버전으로 다운그레이드 하였습니다.

<참조:RVM 설치 방법 : http://railsapps.github.io/install-ruby.html>

루비버전을 2.3.3 으로 다운그레이드 하였다면 
다시 gem install json -v '1.8.3' 명령어를 입력하여  json-1.8.3 설치완료합니다.
루비를 새로 설치 하였기때문에 새로 jekyll를 다시 설치하고 jekyll serve 입력해야 합니다.

2)

in `rescue in specs': Your bundle is locked to public_suffix (2.0.4), but that version could not be found in any of the sources listed in your Gemfile. If you haven't changed sources, that means the author of public_suffix (2.0.4) has removed it. You'll need to update your bundle to a different version of public_suffix (2.0.4) that hasn't been removed in order to install. (Bundler::GemNotFound)

"bundler update" 명령어 입력하여 업데이트하면 해결됩니다.


연결이 되면 브라우저에 로컬저장소 블로그 접속주소를 입력하여 테마가 적용된걸 확인합니다.
접속주소는 테마마다 다르며 터미널에서 주소를 확인 할 수 있습니다.


 Server address: http://127.0.0.1:4000/karna/   <- 접속주소
 Server running... press ctrl-c to stop.


참고) 블로그 접속주소 입력하는 과정중에 발생 할 수 있는 오류
1.테마마다 다르겠지만 혹여 아래 에러가 나타난다면 로컬저장소 폴더 내 about.md 파일을 지워버리면 에러가 사라집니다.
Liquid Exception: Could not locate the included file 'icon-github.html' in any of ["/Users/xxxxxx/_includes"]. Ensure it exists in one of those directories and, if it is a symlink, does not point outside your site source. in about.md

2. 연결은 되는데 하얀 빈 페이지만 뜬다면 로컬저장소 폴더 내 "index.md" 파일을 지워야합니다.

3. 빌드 중 아래 에러가 발생한다면 Error: Address already in use - bind(2) for 127.0.0.1:4000xxx
터미널을 재실행하면 해결됩니다.

2016년 12월 27일 화요일

MAC에서 Jekyll 을 이용한 Github 블로그 만들기

Jekyll 을 이용한 Github 블로그를 만들기!


필요사항
 - Gitbub 계정


1. Jekyll 설치

터미널에서 sudo gem install jekyll 을 입력하여 설치해보자
 sudo gem install jekyll

설치중에 아래 오류가 나타났다면
ERROR:  While executing gem ... (Errno::EPERM)
Operation not permitted - /usr/bin/jekyll
  • 최신 Ruby 설치 :
    brew install ruby
  • 최신 Jekyll 설치 :
    sudo gem install jekyll
루비를 최신버전으로 설치하고 jekyll을 설치하면 해결

2. 로컬 저장소 만들기

로컬저장소로 삼을 특정 폴더위치로 이동하여 jekyll new Github 계정.github.io 입력하여
설치한다.
여기서 사용되는 Github 계정은 Github 가입시 사용한 이름을 입력하면 된다.
 jekyll new Github계정.github.io

실행중에  만일 아래 에러가 발생 한다면


번들러 설치 하도록 합니다.
sudo gem install bundler

만들기가 완료 되었다면 폴더 안에 여러파일이 생성된 것을 확인할 수 있습니다.

생성된 폴더안에 들어가 jekyll serve --watch 를 입력하면
http://localhost:4000 으로 접속하여 로컬에 생성된 블로그를 볼수 있다.
jekyll serve 는 Jekyll이 지역 환경에서 블로그가 제대로 구성되어 있는지 확인하기 위해 제공하는 서버입니다.


3.Repository 생성 (원격 저장소 만들기)

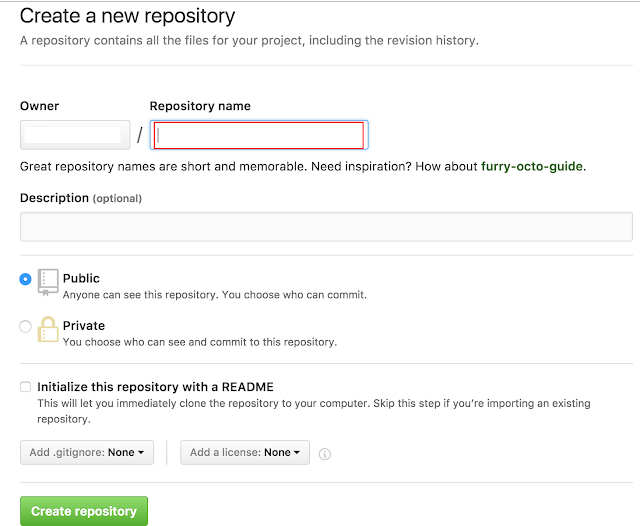
Github 계정으로 로그인후 New Repository를 클릭하여 Repository생성 페이지로 이동한다.


저장소는 Public으로 설정하고 Create repository 버튼을 클릭하여 생성을 완료한다.
*Initialize this repository with a README 는 절대 체크 하면 안됩니다. 나중에 Push중에 오류가 발생함

4. 로컬 저장소와 원격 저장소 연결하기


생성한 jekyll 프로젝트와 Repository 주소를 remote로 연결해 주어야 합니다.
가장먼저 git init 을 입력하여 Git이 추적할수있도록 Git 저장소를 생성합니다.
git init

프로젝트에 git remote add 명령어를 입력하여 저장소와 연결합니다.
git remote add origin {원격저장소 Url}

원격저장소 Url 경우 아래형식처럼 되어있으니 참고토록 하자.
https://github.com/Github 계정/Github 계정.github.io.git
git add 명령어로  모든 변경 파일 index에 추가한다
git add .

변경한다고 추가한 파일을  로컬저장소 등록시 commit 을 사용하는데 뒤에 오는 -m 은 메세지붙인다는 의미로 간단한 메세지를 입력하면 된다.
git commit -m "블로그 초기 파일 commit"

마지막으로 push 할 경우 지역저장소의 내용들이 원격저장소로 복사됩니다.
git push origin master"


저장소에 파일이 제대로 push 되었는지 확인하고 업데이트된 블로그를 확인하세요
http://Github 계정.github.io

2016년 12월 20일 화요일

Swift3 에서 CocoaPods 설치 및 사용하기 (CocoaPods install & library add) @@ in Swift3 - Xcode 8.2 iOS 10

SWIFT3 프로젝트에 CocoaPods 연동하기


- 순서 -

1. 프로젝트 생성

2. CocoaPods 다운로드 및 설치 (처음 설치 시)

3. CocoaPods Podfile 생성 및 설정

4. 라이브러리 설치 및 사용


Step 1 프로젝트 생성

Xcode 를 실행하여 CocoaPods를 연동할 프로젝트를 만든다.
프로젝트 이름은 "cocoapods_test" 로 하였다.


Step 2 CocoaPods 다운로드 및 설치

한번도 CocoaPods 를 설치하지 않았다면 아래와 같이 터미널을 실행하여 CocoaPods 을 설치한다
이미 설치를 했다면 건너뛰도록한다.

1) 터미널 실행하여 설치 명령어 입력 ->  “sudo gem install cocoapods”
(참고로 제거는 sudo gem uninstall cocoapods)

<설치명령어 입력>


<설치 완료>


설치가 완료 되었다면 필요한 라이브러리들을 정리하기 위해 “pod setup --verbose” 명령어 실행
*설치 안해도 됩니다 필요하다면 설치하세요 참고로 오래 걸립니다. (5시간걸림)
 너무 오래걸려 해결책을 찾아 시도 하였으나 저한테는 변화가 없었음.. 참고하세요
http://stackoverflow.com/questions/21022638/pod-install-is-staying-on-setting-up-cocoapods-master-repo


<“pod setup --verbose” 입력>

Step 3 CocoaPods Podfile 생성 및 설정

설치를 완료했다면 Step1에서 생성한 프로젝트 폴더 내 경로로 이동하여 “pod init” 명령어를 실행한다. 실행후 자동으로 PodFile이 생성된다.

<"pod init"명령어 실행 후 Podfile 이 생성 됨을 확인할 수 있다.>


<프로젝트 폴더>


Podfile 을 여는 명령어는 두가지가 있다
"open -e podfile"
"open -a Xcode Podfile"


하나는 일반 메모장을 여는 것이고 하나는 Xcode 에서 파일을 여는 것이다.
둘중 아무거나 해도 상관없으니 일단 파일을 열어보자


Step 4  라이브러리 설치 및 사용

위에서 열었던 podfile 에 라이브러리를 추가한다. 
일단 필요없는부분을 지우고 라이브러리 "SCLAlertView"를 추가하여보자

이제 저장을 하고  터미널로 돌아와 프로젝트 폴더 경로에서 "pod install" 입력하여 라이브러리를 설치
하도록 한다


설치가 다 되었다면 프로젝트 폴더내에 프로젝트명.xcworkspace 파일을 열어본다


실행된 Xcode를 보면 라이브러리가  아래와 같이 xcode내에서 Pods 프로젝트가 import되어 있는 것을 확인할수 있다.


방금전 설치한 라이브러리가 정상적으로 설치되어 있는지 아래 ViewController 클래스내 함수에서
직접 코딩을 통해 확인가능하다.

2016년 12월 6일 화요일

UIViewController, Dismiss and Present @@ in Swift3 - Xcode 8.0 iOS 10

기존에 열려있는 firstViewController 를 Dismiss 하고 secondViewController를 Present 하기 위해
---------------------------------------------------------------------------------------
self.dismiss(animated: true, completion: {
  let vc = self.storyboard?.instantiateViewController(withIdentifier: "secondViewController")
  self.present(vc!, animated: true, completion: nil)
})
=========================================================================
아래 오류가 뜬다.
whose view is not in the window hierarchy!


이때는 뷰계층구조상 rootViewController를 사용해야한다.
---------------------------------------------------------------------------------------
self.dismiss(animated: true, completion: {
   let vc = self.storyboard?.instantiateViewController(withIdentifier: "secondViewController")
   let appDelegate = UIApplication.shared.delegate as! AppDelegate
   appDelegate.window?.rootViewController!.present(vc, animated: true, completion: nil) 
})
=========================================================================

이렇게 하면 기존의 firstViewController는 닫히고 secondViewController 가 열린다

2016년 12월 5일 월요일

coreData Entites 이슈 @@ in Swift3 - Xcode 8.0 iOS 10


코어데이터의 Entites 생성하고 Attributes 값을 추가한 다음
xcode - > Editor -> createNSManagedObject SubClass.. 를 클릭하여
파일이 생성된 후 빌드 시 아래 이슈가 발생한다면

Command /Applications/Xcode.app/Contents/Developer/Toolchains/XcodeDefault.xctoolchain/usr/bin/swiftc failed with exit code 1


코어데이터의 Entites를 선택하여 우측 inspector 탭을 눌러
Class 항목의 Codegen을 Manual/None 로 선택하여 빌드하면 이슈가 사라진다

2016년 12월 4일 일요일

Archive 가 비활성화 되는 경우 해결법! @@ in Swift3 - Xcode 8.0 iOS 10

xcode  ->  product -> Archive 가 비활성화 되는 경우 해결법!

시뮬레이터로만 빌드하였을 경우 Archive 항목이 비활성화 되는 경우가 발생한다

그땐 디바이스를 연결하여 빌드하면 활성화 된다.

2016년 11월 25일 금요일

MFMailComposeViewController 로 이메일 보내기 (Send Email) @@ in Swift3 - Xcode 8.0 iOS 10

MFMailComposeViewController 를 이용해 이메일 보내기 !

//import MessageUI 하기
  import UIKit
  import MessageUI

// MFMailComposeViewControllerDelegate 추가 
class OptionpageViewController: UIViewController, MFMailComposeViewControllerDelegate {

    override func viewDidLoad() {
         super.viewDidLoad()

    }
     ...
}


//Email Send 함수 설정
func EmailSend(_ sender: AnyObject){
     let mailVC = MFMailComposeViewController()
     mailVC.mailComposeDelegate = self
     mailVC.setToRecipients(["yourEmail@xxx.xx"])
     mailVC.setSubject("")
     mailVC.setMessageBody("Your messagge", isHTML: false)
     present(mailVC, animated: true, completion: nil)
// 2016.12.2 수정  앱 심사중에  네트워크 충돌로 거부사유 됨 아래코드 활용
    if MFMailComposeViewController.canSendMail(){
       self.present(mailVC, animated: true, completion: nil)
    }
        }

       
}


// mailComposeController 델리게이트 메소드 활용하여 창 닫기 함수 설정

func mailComposeController(_ controller: MFMailComposeViewController,
didFinishWith result: MFMailComposeResult, error: Error?) {
     controller.dismiss(animated: true, completion: nil)
}


2016년 11월 21일 월요일

UIActivityViewController 를 이용한 데이터 share @@ in Swift3 - Xcode 8.0 iOS 10

UIActivityViewController

// 데이터를 배열에 담는다
let  textToShare  = "share Text"
let  shareimg  : UIImage = UIImage(named: "image1.png")!


let shareItems : Array = [shareimg!!, textToShare] as [Any]  // <- 서로 타입이 달라 Any 가 붙는다

let activityViewController:UIActivityViewController = UIActivityViewController(activityItems: shareItems, applicationActivities: nil)

// share 타입 추가 하기 ( 타입을 지정해주지 않아도 기본적인건 추가되는듯..)
activityViewController.excludedActivityTypes = [UIActivityType.print, UIActivityType.postToWeibo, UIActivityType.copyToPasteboard, UIActivityType.addToReadingList, UIActivityType.postToVimeo]


self.present(activityViewController, animated: true, completion: nil)


* 타입 참조

유형 이름요약
UIActivityType.postToFacebookFacebook에 올리기
UIActivityType.postToTwitterTwitter에 올리기
UIActivityType.message메시지 보내기
UIActivityType.mail이메일 보내기
UIActivityType.print프린트 대화를 시작
UIActivityType.copyToPasteboard클릭 보드에 붙여 넣기
UIActivityType.assignToContact연락처를 호출
UIActivityType.saveToCameraRoll카메라 롤에 저장
UIActivityType.addToReadingListSafari의 읽기 목록에 추가
UIActivityType.postToFlickrFlickr에 게시
UIActivityType.postToVimeoVimeo에 게시
UIActivityType.postToWeiboWeibo 에 게시
UIActivityType.postToTencentWeiboTencent 에 게시

2016년 11월 15일 화요일

Swift3 AdMob (애드몹) 적용 @@ in Swift3 - Xcode 8.0 iOS 10

앱에 AdMob 적용 시 준비해야할 사항

1. AdMob 가입 

2. AdMob 적용할 앱

3. GoogleMobileAds.framework

AdMob 가입 절차를 따르다 보면 GoogleMobileAds.framework 다운로드까지 할 수 있다.
AdMob에 가입했으면 앱을 등록 하고 광고를 만들어준다.

제대로 했다면 아래 이미지 처럼 광고가 추가 되었음을 확인 할 수 있다.


Xcode 에 GoogleMobileAds.framework 를 추가하고 코드를 입력한다


import UIKit
// GoogleMobileAds 추가
import GoogleMobileAds
// Delegate 추가


class ViewController: UIViewController, GADBannerViewDelegate {
// Main.storyboard 에서 뷰를 생성하여 아울렛을 사용해도 상관 없다
let bannerView: GADBannerView = GADBannerView(adSize: kGADAdSizeSmartBannerPortrait)
// adSize의 경우 여러모드를 제공하니 확인하여 필요한 모드를 사용한다

  override func viewDidLoad() {
    super.viewDidLoad()
    bannerView.delegate = self
    // 광고 단위 ID 를 넣으면 된다
    bannerView.adUnitID = "ca-app-pub-6xxxxxxxx60/1xxxxxxx34"
    bannerView.rootViewController = self
    let gadRequest:GADRequest = GADRequest()
    gadRequest.testDevices = [kGADSimulatorID]
    bannerView.load(gadRequest)
    // 배너뷰 사이즈 설정
    bannerView.frame = CGRect(x: 0, y: view.bounds.height - bannerView.frame.size.height, width: bannerView.frame.size.width, height: bannerView.frame.size.height)
    self.view.addSubview(bannerView)
  }
}


2016년 11월 10일 목요일

guard 구문 사용 @@ Swift3.0

guard 구문

if 구문과 마찬가지로 주어진 표현식의 결과가 참인지 거짓인지에 따라 구문의 실행 여부를 결정짓는 방식의 조건문입니다.
if 구문과의 차이점은  guard 구문에는  else 블록이 필수이지만, 표현식의 결과가 참일 때 실행되는 블록이 없다는 점입니다.

guard 구문은 주로 후속 코드들이 실행되기 전에 반드시 특정 조건을 만족하는지 확인하는 용도로 사용합니다. 다시 말해 guard 구문은 특정 조건을 만족하지 않은 채 후속 코드를 실행하면 심각한 오류가 발생하는 경우, 그 대신 전체 구문을 조기 종료하기 위한 목적으로 사용됩니다.
따라서 guard 구문의 else 블록을 작성할 때에는 이후의 코드가 더 진행되지 않게 처리하는 작업이 필요합니다. 주로 함수나 메소드에서 return 구문이 이 역할을 합니다

<표현식>
guard 특정 조건 또는 표현식 else{
        실행할 구문(조건 또는 표현식의 결과가 false일 때)
}
 
<예제 코드>
func divide(base:Int){
    
    guard base != 0 else{
     print("x")
        return
    }
    let resutl  = 100 / base
    print(resutl)
    
}
divide(base: 0// "x"

divide(base: 20) // 5

2016년 11월 9일 수요일

Today Extension (widget) 연결된 App 열기 @@ in Swift3.0

Today Extension (widget)이 실행되고 storyboard 가 나타났을때
View 나 button 을 클릭하여 연결된 앱을 열고자 할때 사용하는 방법이다.

일단 extensionContext 속성을 사용해야한다
일단 Today Extension 을 생성 했다는 가정하에 설명하도록 하겠다
Today Extension에서 앱을 실행하기 위해선  해당 앱의 CFBundleURLSchemes 값을 정의 해야한다
일단 해당앱의 Info.plist 파일을 Source Code 로 연다


위 이미지 처럼 코드를 추가해준다
설명하자면  앱을 식별할 수 있도록 App 의 URLName 과  URLSchemes 을 선언해주는 것이다
Today Extension 에서 아래 함수 (openApp()를 호출할 수 있도록 버튼이나 뷰를 만들고
TodayViewController 에 아래 메소드를 추가한다

func openApp(_ sender: AnyObject) {
    // UrlName = com.Tester.openApp    <ㄱ
    // URLSchemes = openApp            <-  두값이 같아야함
    let url:NSURL? = NSURL(string: "openApp:")  
    // : <- 잊지말고 붙여넣자

    if let appurl = url{

    self.extensionContext!.open(appurl as URL, completionHandler: nil)

    }

}

다시 빌드하여 View 나 button을 터치하여 테스트하면 앱이 열리는 것을 확인 할 수 있다.


2016년 11월 8일 화요일

Today Extension View(.compact, .expanded) Size Change (Widget Extension height 값 바꾸는 방법) @@ in Swift3 - Xcode 8.0 iOS 10

swift 3에서는 widget의 DisplayMode 에 따라 높이 값이 조절 된다
모드는 2가지로 나뉜다 

.compact (defult) : 높이값이 정해져 있어 조절 불가능 (110px)
.expanded : 자신이 높이값을 정할수 있다  단, Show more / less 버튼이 활성화 된다

 DisplayMode 를 expanded 로 하고 싶다면 TodayViewController.swift 에 아래 코드를 추가 해준다

override func viewDidLoad() {
  super.viewDidLoad()
  self.extensionContext?.widgetLargestAvailableDisplayMode = NCWidgetDisplayMode.expanded
}

그리고 아래 메소드를 추가해준다


func widgetActiveDisplayModeDidChange(_ activeDisplayMode: NCWidgetDisplayMode, withMaximumSize maxSize: CGSize){
  if (activeDisplayMode == NCWidgetDisplayMode.compact) {
  // Show less
  self.preferredContentSize = maxSize; // 110 px
  } else {
  // Show more
  self.preferredContentSize = CGSize(width: maxSize.width, height: 200)
} }


빌더해서 Show Less / Show More 버튼을 눌러서 뷰 사이즈가 바뀌는것을
확인해보자

2016년 11월 1일 화요일

photoLibrary 접근 시 발생하는 이슈 @@ in Swift3 - Xcode 8.0 iOS 10

iOS 10으로  업데이트 되면서 사용자 데이터 접근 시 변경된 내용이 있다

예를 들어 사용자의 photoLibrary 에 접근 시  이슈가 발생 한다

<이슈 내용>
This app has crashed because it attempted to access privacy-sensitive data without a usage description. The app's Info.plist must contain an NSPhotoLibraryUsageDescription key with a string value explaining to the user how the app uses this data.This app has crashed because it attempted to access privacy-sensitive data without a usage description. The app's Info.plist must contain an NSPhotoLibraryUsageDescription key with a string value explaining to the user how the app uses this data. 


업데이트가 되면서 사용자 데이터 접근하려면 사용목적을 따로 입력해야 한다

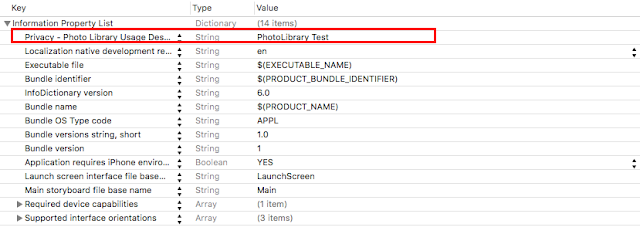
photoLibrary 경우 접근을 하려면 NSPhotoLibraryUsageDescription키를 사용한다.

Info.plist파일을 열어
위 이미지 처럼 Key 값을 추가 하고 사용목적을 입력한다

앱을 실행하여 photoLibrary 에 접근 하면 이슈가 해결되고 알럿창이 뜬다

photoLibrary 외에도  미디어 라이브러리, 카메라, 연락처, 위치정보 등 사용자 데이터에 접근 시 필수적으로 사용목적을 입력해야한다.


아직 정확한 원인이 파악되지 않았으나 Library 접근하는 view에서  디버깅 시 아래 같은  이슈가 발생하는 경우가 있다

<이슈 내용>
Class PLBuildVersion is implemented in both /Applications/Xcode.app/Contents/Developer/Platforms/iPhoneSimulator.platform/Developer/SDKs/iPhoneSimulator.sdk/System/Library/PrivateFrameworks/AssetsLibraryServices.framework/AssetsLibraryServices (0x1198125910) and /Applications/Xcode.app/Contents/Developer/Platforms/iPhoneSimulator.platform/Developer/SDKs/iPhoneSimulator.sdk/System/Library/PrivateFrameworks/PhotoLibraryServices.framework/PhotoLibraryServices (0x11c77c210). One of the two will be used

임시방편으로 아래코드처럼  AssetsLibrary framework를 import 해주면 디버깅에서 아래오류를 없앨수 있다

import AssetsLibrary 


2016년 10월 24일 월요일

Core Data, NSManagedObjectContext (Save the Data, Retrieve the Data) 사용 @@ in Swift3 - Xcode 8.0 iOS 10

오늘은 Core Data의 ManagedObject 에 데이터 저장 및 가져오기를 하도록 하겠습니다.

1.CoreData 프레임워크 import


2. ManagedObjectContext 얻기

Swift2.x
-------------------------------------------------------------------------------
let appDelegate = UIApplication.shared.delegate as! AppDelegate
let managedContext = appDelegate.managedObjectContext
==================================================================

Swift3
-------------------------------------------------------------------------------
let appDelegate = UIApplication.shared.delegate as! AppDelegate
let managedContext = appDelegate.persistentContainer.viewContext
==================================================================

ManagedObjectContext 값을 getContext () 함수에 리턴 하도록 하자
-------------------------------------------------------------------------------
func getContext () -> NSManagedObjectContext {
   let appDelegate = UIApplication.shared.delegate as! AppDelegate
   return appDelegate.persistentContainer.viewContext
}
==================================================================

3. ManagedObject 에 데이터 저장 (Save the Data)
-------------------------------------------------------------------------------
func SaveData (nameC: String, ageC: Int) {
   //ManagedObjectContext 불러오기
   let context = getContext()
   //entity 설정
   let entity = NSEntityDescription.entity(forEntityName: "Item", in: context)
   let Itmes = NSManagedObject(entity: entity!, insertInto: context)
   //entity 값 설정 key 값 == entity 속성값 이름
   Itmes.setValue(nameC, forKey: "name")
   Itmes.setValue(ageC, forKey: "age")


// 객체 저장 하기
  do {
     try context.save()
     print("saved!")
     } catch let error as NSError {
        print("Could not save \(error), \(error.userInfo)")
  } catch {
     }
}

==================================================================

4. ManagedObject 에 데이터 가져오기 (Retrieve the Data)
-------------------------------------------------------------------------------
func getData () {
    //entity값에 대한 fetch request 생성
    let fetchRequest: NSFetchRequest<Item> = Item.fetchRequest()
 do {
    // 결과값 담기
    let searchResults = try getContext().fetch(fetchRequest)
    // for 문을 이용하여 Key 값에 대한 Value 값 가져오기
    for Items in searchResults as [NSManagedObject] {
    print("\(Items.value(forKey: "name"))")
    print("\(Items.value(forKey: "age"))")
    }
 } catch {
    print("Error with request: \(error)")
 }
}
==================================================================

Core Data, NSManagedObjectContext (Save the Data, Retrieve the Data) 생성 @@ in Swift3 - Xcode 8.0 iOS 10

1. 프로젝트 생성 및 Entity Description 만들기
* Use Core Data  체크!!


프로젝트가 생성되면<projectname> .Xcdatamodeld 파일을 선택 합니다.


하단의 Add Entity 버튼을 클릭하여 새로운 Entity 를 만듭니다
저는 "Item" 이라는 Entity를 만들었습니다.
* 주의 해야할 점은 Entity 이름의 첫 글자는 대문자로 해야 오류가 발생하지 않습니다.


Attribute 를 추가 하기 위해  " + " 나 하단의 Add Attribute 버튼을 누른다
Attribute 는 속성과 타입, 옵션등을 입력해야 한다.

Attribute 에 String 타입의 "name" 과 Integer 32 타입의 "age" 를 추가 하였다

2. NSManagedObject 하위 클래스 만들기

Entity 정의가 끝났다면 Entity에 대한 새로운 NSManagedObject를 생성해야한다.
Xcode -> Editor -> Create NSManagedObject Subclass... 메뉴를 선택 한다.


다음창이 뜨면 Entity 체크를 확인하고 Next 클릭

또 Next 클릭

완료가 되면 파일이 추가 된것을 확인할 수 있다.


파일을 확인해보면

NSManagedObject 하위 클래스 만들기 까지 완료 하였다 
Core Data, NSManagedObjectContext (Save the Data, Retrieve the Data) 사용  - 2
에서 NSManagedObject 저장하기와  가져오기 내용을 정리하도록 하겠다.


추천 게시물

애플 개발자 등록방법 2016년 5월 8일 기준!!

애플 개발자 등록 절차 1. 개발자 등록 페이지 이동    애플 개발자 로그인 > Account 페이지 이동 > 하단 영역 클릭 (이미지 참조)   >> Enroll 클릭 >> 무조건 승인!! ...